Well, I had been contemplating a case mode for a long time. My 1.0Ghz was losing its luster, so
I decided to build a new machine (2.53Ghz) so I could keep up with my fellow LAN gamers (Chip Envy 8^).
I couldn't think of a better time to try my hand at a little case modding. I have tried to capture a
few highlights of the effort in case any of you are interested in attempting it yourselves.
If you are hesitant, trust me, it was just plain fun and far easier than I had originally
anticipated. So pick up your Dremel, slap in a cutting wheel, put on your protective goggles, and
start cutting!
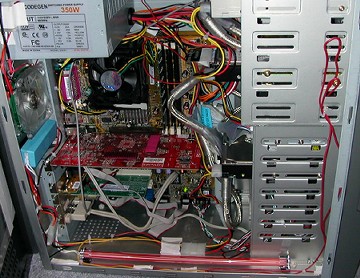
For starters, I did purchase a charcoal gray Codegen case with a pearl metallic finish. The only major
requirement was at least one smooth side capable of containing the desired graphic. A lot of new cases
are coming with viewing windows, side fans, etc. so the preliminary criteria actually kicked out
a lot of potential cases.
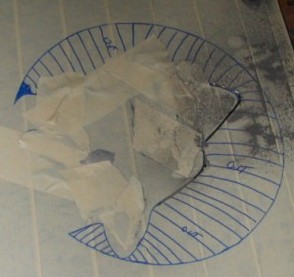
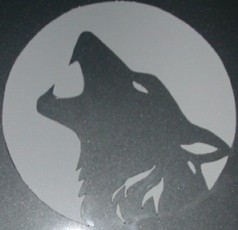
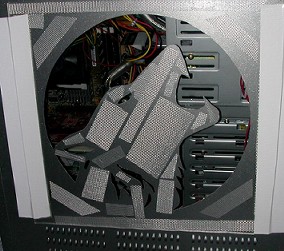
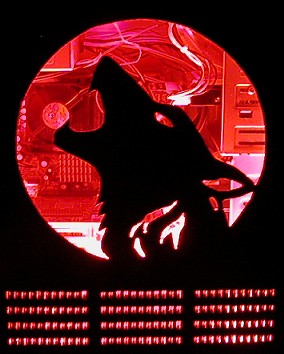
The next task to was decide on the graphic to use. This was actually pretty easy since I happen to
spend a significant amount of time carving pumpkins every Halloween. Since the cut-out concept is
exactly the same, I used my favorite Pumpkin Master's template. A quick scan and a few resizing steps
using Paint Shop Pro resulted in the cut-out pattern for my case. In an attempt to save the finish
on the outside of the panel being cut, I went ahead and put a layer of masking tape directly on top of
the paint. The goal was to prevent paint chipping and hopefully give me a little room for error if the
Dremel cut loose from its intended path. Once the layer of tape was on, I transferred the pattern directly
onto the panel.
It was now time to start cutting. The Dremel was the recommended weapon of choice. Since the Dremel
I own is not the easiest thing to manipulate, I decided to purchase a Flex-Shaft. I need to point
out at this time, that the Flex-Shaft that was purchased was not (I repeat NOT) the heavy duty version.
Why do I point this out? ... as a warning to anyone else out there that is also considering the cheaper
way out. Minutes before completing the cut-out step, the d*mn think actually caught fire. That's right,
the drive shaft actually melted through catching the rubber coating on fire. The root cause of the
problem hasn't been isolated yet, but my guess there is some fine print somewhere that explains this
little crisis, but directions are for wimps 8^).
When I purchased the Flex-Shaft, I also picked up a set of medium cutting wheels (fiberglass reinforced).
I slapped in the cutter shaft, loaded up a cutting wheel on the end and set forth creating an
unbelievable shower of sparks as grinding wheel met fine Nippon Steel. First I rough cut the fur
being careful not to let the Dremel slip outside of the cutting area. There appears to be at least
two ways to do the actual cutting. One way is to cut through the metal and then moving the grinding
wheel into the edge of the steel being cut (think jigsaw with a round blade). The other is to simply
grind down through the top each time. I opted for the latter since I could lay a groove line down along
the pattern edge and then follow that cut successive times until it went through. The saw method ate through
the cutting wheels too fast and didn't give me the fine control I wanted. As a note, it took 7 cutting
disks to complete the rough cut.
 Once the rough cut was finished, I switched over to a diamond tipped grinding stone. I purchased a set
of about 15 diamond tipped Dremel bits with an assortment of diameters and shapes. This gave me the
capability to get into the tight space as well as providing a larger diameter for trimming the
larger sizes. This step takes forever, and requires a steady hand to keep the bit focused on the
edge of the steel.
Once the cutting and grinding was done, I went ahead and removed the protective layer of masking tape.
Keep the grinding bits out. The next item of business is to de-burr the cut edges on both sides of the
panel. Unfortunately, I made some rookie mistakes while doing this that resulted in a couple of slips
of the Dremel. It is pretty hard to see the mistakes in light and impossible to see in the dark, but the fact that
I know exactly where my screw-ups are is quite disappointing. Oh well, next time I will be more careful.
Now you on the other hand have been warned - keep the Dremel firmly in your hand and go at a 30-40 degree
angle perpendicular to the cut edge. The little burs should shave off like butter once you get the angle
right. Run your finger (lightly! remember, it's steel shavings) along the finished edge to verify that there
are no burs on either side of the panel.
Now step back and admire your work (grunting like Tim Allen is a fine way to celebrate your accomplishments!)
Once the rough cut was finished, I switched over to a diamond tipped grinding stone. I purchased a set
of about 15 diamond tipped Dremel bits with an assortment of diameters and shapes. This gave me the
capability to get into the tight space as well as providing a larger diameter for trimming the
larger sizes. This step takes forever, and requires a steady hand to keep the bit focused on the
edge of the steel.
Once the cutting and grinding was done, I went ahead and removed the protective layer of masking tape.
Keep the grinding bits out. The next item of business is to de-burr the cut edges on both sides of the
panel. Unfortunately, I made some rookie mistakes while doing this that resulted in a couple of slips
of the Dremel. It is pretty hard to see the mistakes in light and impossible to see in the dark, but the fact that
I know exactly where my screw-ups are is quite disappointing. Oh well, next time I will be more careful.
Now you on the other hand have been warned - keep the Dremel firmly in your hand and go at a 30-40 degree
angle perpendicular to the cut edge. The little burs should shave off like butter once you get the angle
right. Run your finger (lightly! remember, it's steel shavings) along the finished edge to verify that there
are no burs on either side of the panel.
Now step back and admire your work (grunting like Tim Allen is a fine way to celebrate your accomplishments!)
 I went ahead and painted the newly exposed inside edges of the cut since I had basically removed the
factory supplied protective coating. It was also a bright silver which contrasted with the charcoal
gray of the box. I basically picked up some grey metallic paint for this at a local Michaels.
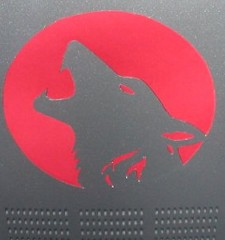
Okay, now it is time to see how it will look. I basically stuck a piece of construction paper behind it
in order to get a feel for how it would look when I was done.
I went ahead and painted the newly exposed inside edges of the cut since I had basically removed the
factory supplied protective coating. It was also a bright silver which contrasted with the charcoal
gray of the box. I basically picked up some grey metallic paint for this at a local Michaels.
Okay, now it is time to see how it will look. I basically stuck a piece of construction paper behind it
in order to get a feel for how it would look when I was done.
 Okay, the hardest part is done. You now need to seal up the case. I guess you could leave the
opening as is, but the edges are pretty sharp, overall case flow would be damaged, and I am not sure
you want all that dust settling on your components. Your choice, but I went ahead and sealed it up
with a panel of Lucite from Menards. It took me a few tries to determine the best way to cut
the Lucite. After a few failed attempts (knife scoring, coping saw etc.) I decided to break out
the portable bench scroll saw (electric). With a fine tooth blade, the saw cut through the
plastic like butter without any burn/melting marks. As a note, be sure the edges of the window
does not impede with the rest of the case. In other words, make sure you leave enough room on the
edges to put the panel back on. Different cases have different connection mechanism, so be sure
and try it out before finalizing the window placement. Oh, you probably figured it out already, but
just in case, I simply used a square shape - no need to get fancy with this since you will not be
able to see the edges anyway. Just make sure you have enough overlap to affix it to the panel.
pre-window
Okay, the hardest part is done. You now need to seal up the case. I guess you could leave the
opening as is, but the edges are pretty sharp, overall case flow would be damaged, and I am not sure
you want all that dust settling on your components. Your choice, but I went ahead and sealed it up
with a panel of Lucite from Menards. It took me a few tries to determine the best way to cut
the Lucite. After a few failed attempts (knife scoring, coping saw etc.) I decided to break out
the portable bench scroll saw (electric). With a fine tooth blade, the saw cut through the
plastic like butter without any burn/melting marks. As a note, be sure the edges of the window
does not impede with the rest of the case. In other words, make sure you leave enough room on the
edges to put the panel back on. Different cases have different connection mechanism, so be sure
and try it out before finalizing the window placement. Oh, you probably figured it out already, but
just in case, I simply used a square shape - no need to get fancy with this since you will not be
able to see the edges anyway. Just make sure you have enough overlap to affix it to the panel.
pre-window
 I actually thought about how to glue it down for some time. This included numerous trips to the local
hardware stores to read the back of various glues and epoxies. Strangely enough, none of them
gave case modding as a preferred use for their product 8^). After reading the backs of about
20 different glues, I decided carpet tape would do the trick. This gave me a way to lock in
the middle portion of the cut-out (wolf head), but still give me a way to change the glass should
something ever happen. The panel was turned over and a number of strips of carpet tape were
added along the sides and interior of the cutout. Once all of the tapes had their backing removed,
I simply pressed the Lucite in place. This stuck pretty good, but I went ahead and put a layer of
white duct tape alone the sides just to make sure it didn't come off during transit to and from LAN
gaming parties.
I actually thought about how to glue it down for some time. This included numerous trips to the local
hardware stores to read the back of various glues and epoxies. Strangely enough, none of them
gave case modding as a preferred use for their product 8^). After reading the backs of about
20 different glues, I decided carpet tape would do the trick. This gave me a way to lock in
the middle portion of the cut-out (wolf head), but still give me a way to change the glass should
something ever happen. The panel was turned over and a number of strips of carpet tape were
added along the sides and interior of the cutout. Once all of the tapes had their backing removed,
I simply pressed the Lucite in place. This stuck pretty good, but I went ahead and put a layer of
white duct tape alone the sides just to make sure it didn't come off during transit to and from LAN
gaming parties.
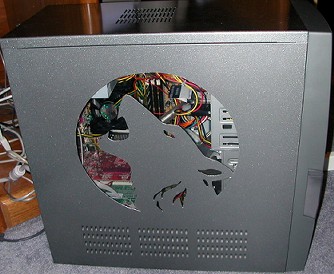
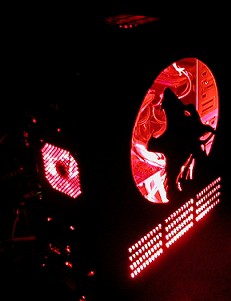
 Okay, the rest is pretty much icing on the cake (or rather case). To enhance the cut-out visual, I
purchased an 11 inch red cool ray neon tube and replaced my original two case fans with clear ones with a
set of red LEDs along their edges. I also decided to add the ability to turn on and off the
lights. My wife laughs at me every time she sees my case, so this way I could simply turn the
lighting off in an attempt to limit the "You're a GEEK" comments 8^). I also wasn't sure how long a
neon tube lasts and didn't want to fork out the cash to replace it if I didn't have to. I purchased
some paddle switches, wire, and some power cable extensions at Radio Shack. Since I had a few bays open,
I decided to cut the switches there - that and the fact I had extra ones in case I screwed up 8^)
The switch pattern is pretty much up to you. I put the switches in with enough room on the side
to add mods in the future - the possibilities are only limited by your imagination boundaries.
As a note, I had difficulties trying to drill the holes in the bay covers. To solve the problem,
I drilled a small hole first and then used our friend the diamond grinder to shave (actually melt),
the hole to the desired size. I also put a layer of masking tape down to protect the paint there
as well.
Okay, the rest is pretty much icing on the cake (or rather case). To enhance the cut-out visual, I
purchased an 11 inch red cool ray neon tube and replaced my original two case fans with clear ones with a
set of red LEDs along their edges. I also decided to add the ability to turn on and off the
lights. My wife laughs at me every time she sees my case, so this way I could simply turn the
lighting off in an attempt to limit the "You're a GEEK" comments 8^). I also wasn't sure how long a
neon tube lasts and didn't want to fork out the cash to replace it if I didn't have to. I purchased
some paddle switches, wire, and some power cable extensions at Radio Shack. Since I had a few bays open,
I decided to cut the switches there - that and the fact I had extra ones in case I screwed up 8^)
The switch pattern is pretty much up to you. I put the switches in with enough room on the side
to add mods in the future - the possibilities are only limited by your imagination boundaries.
As a note, I had difficulties trying to drill the holes in the bay covers. To solve the problem,
I drilled a small hole first and then used our friend the diamond grinder to shave (actually melt),
the hole to the desired size. I also put a layer of masking tape down to protect the paint there
as well.
 Wiring the switch for the neon tube was pretty easy since it already came wired for a switch. I
simply cut the existing leads and wired in my switch (piece of cake). My fans actually turned out
a little harder since I had to clip tiny wires which fed power to the ring of LEDs on the
outside of the fan casing. Once clipped, I simply ran a feed to the front switches. I now
have the ability to turn off the fan LED's and the neon tube individually from the front of the case.
(Wife coming down the hall ... quickly reach down and flip the switches off, wife continues past
without comment -- sweet). Note the third switch is wired into my graphics card. In the heat
of LAN battle I can switch it on to triple my FPS's almost instantly.
fans only
Wiring the switch for the neon tube was pretty easy since it already came wired for a switch. I
simply cut the existing leads and wired in my switch (piece of cake). My fans actually turned out
a little harder since I had to clip tiny wires which fed power to the ring of LEDs on the
outside of the fan casing. Once clipped, I simply ran a feed to the front switches. I now
have the ability to turn off the fan LED's and the neon tube individually from the front of the case.
(Wife coming down the hall ... quickly reach down and flip the switches off, wife continues past
without comment -- sweet). Note the third switch is wired into my graphics card. In the heat
of LAN battle I can switch it on to triple my FPS's almost instantly.
fans only
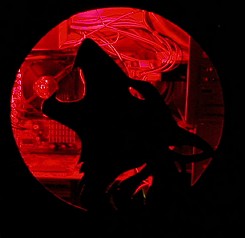 fans and neon tube
 Hope you enjoy and best of luck with your attempt(s)!
|
